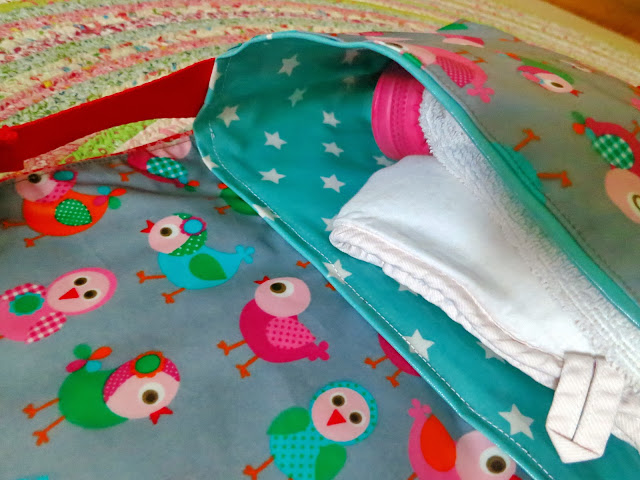
A toddler messenger bag for her swimming lessons. It was really needed, and when I saw these laminated fabrics at At Home Hobby I thought they would be perfect for this purpose. I made it reversible and therefore waterproof on both sides, and for the first time learnt how to make an adjustable strap, thanks to this tutorial.
Wednesday, October 30, 2013
uma mala para a natação :: a toddler bag for swimming
Uma mala para as aulas de natação. Ela estava mesmo a precisar, e quando vi estes tecidos impermeáveis na At Home Hobby achei-os perfeitos para o propósito. Fi-la reversível e impermeável dos dois lados, e pela primeira vez aprendi a fazer uma alça ajustável, graças a este tutorial.
A toddler messenger bag for her swimming lessons. It was really needed, and when I saw these laminated fabrics at At Home Hobby I thought they would be perfect for this purpose. I made it reversible and therefore waterproof on both sides, and for the first time learnt how to make an adjustable strap, thanks to this tutorial.
Monday, October 28, 2013
finished :: the Ursula Cardigan
Estou apaixonada por este casaco. É provavelmente a peça mais bonita que tricotei até agora (eu sei que digo sempre isto, mas acho que até é um bom sinal, certo ?). E com este projecto fiquei rendida (i) ao fair isle, (ii) ao steeking e (iii) às lãs Jamieson & Smith.
O padrão: instruções detalhadas e muito precisas, como sempre (este é já o 6º projecto da Kate Davies que tricoto e continuo a ser grande fã) e tive de fazer apenas pequenas modificações:
- não faço amostras, e apesar de neste padrão a autora realçar que é muito importante medir uma amostra, arrisquei fazer o meu tamanho normal como faço sempre. Após a primeira repetição percebi que o meu stitch gauge estava perfeito, mas o row gauge era maior. Como queria um casaco ligeiramente mais comprido não seria problemático mas mesmo assim tive de omitir uma repetição para que ficasse com o comprimento pretendido. Da mesma forma nas cavas tive de tricotar menos uma repetição do que o padrão pedia.
- mangas mais compridas e finas
Depois de lavado e bloqueado a lã ficou ainda mais macia e a peça cresceu um pouco em comprimento (uns 2 cm), o que tornou o resultado final ainda melhor.
Finalmente, apenas uma pequena nota que gostaria de realçar: para o tamanho que fiz (o 2º mais pequeno) o padrão especifica que são necessários 12 novelos da cor principal. No entanto, apenas utilizei 9 (o que era exactamente o número que tinha), mesmo apesar de o ter feito um pouco mais comprido.
I'm in love with this cardigan. Seriously, this must be the nicest thing I've ever knit so far (I know, I always say that when I show a new knit, but then I guess that's a good thing right ?). And with this project I am finally a convert to (i) fair isle (ii) steeking and (iii) Jamieson & Smith yarns.
The pattern: very precise and detailed instructions, as always (this is the sixth Kate Davies pattern that I knit and I'm an even bigger fan now) and I only had to make a few changes:
- I don't swatch, and although Kate specifically says in her pattern that it's important to do so, I decided to simply go for it and knit my usual size. After the first pattern repeat I realised my stitch gauge was spot on but my row gauge was larger. Since I wanted a slightly longer cardigan this would actually not be a problem but even so I had to knit one less color repeat to make it the length I wanted. Also for the armholes I knit one less repeat than the pattern asked for.
- made sleeves longer and more snug
After washed and blocked the yarn turned even more soft and the cardigan grew a bit lengthwise (about 2 cm), which made it even better.
Finally just a small note on yardage: the size I made asked for 12 skeins. however I only used 9 (luckily that was exactly the number I had, since I used the yarn I had bought to make a Puffin Sweater), even though I made it a bit longer. Of course the fact that my gauge was off is probably the reason but I've found that on Kate's patterns I usually end up using less yarn than what's asked for.
Pattern / Padrão: Ursula Cardigan, by Kate Davies
Needles / Agulhas: 2.75 and 3.0 mm
Yarn / Fio: Jamieson & Smith 2-ply Jumper Weight
Ravelry project page here / página do project no Ravelry aqui
Sunday, October 27, 2013
nearby Chamonix :: Chateau de Menthon + Annécy
Some photos of the inside of the apartment we rented in Vallorcine. Not sure if the residence deserves its 5 stars, but it was nice enough and perfectly adequate for our stay, so I'd definitely reccomend it for families with small children (the indoor pool, playground and mini-golf were great for entertainment)
Our flight back to Portugal was not until the evening so we decided to take a leisurely drive towards Genève airport by the shore of Lake Annécy, and stop to visit le Château de Menthon-Saint-Bernard. We didn't visit the interior, but the garden and exterior are worth a short walk. Just look at those views ...
And finally, we spent the afternoon in the lovely city of Annécy. We've driven through it numerous times in the past during our ski trips but had never actually stopped for a visit. It was a very nice surprise, I had no idea it was so pretty. Being a Saturday afternoon with sunny weather in August meant that it was crowded with tourists and everyone seemed to be outside, but even that didn't make it less pleasant.
:: here, near the ex-libris Palais de L'Isle
:: we HAD to stop by the famous Glacier des Alpes for ice cream. See the huge line though ? Well, we waited for a table to vacate and sat to be served, which was way more quicker than waiting in line. However, when sitting you must eat one of the ice cream dishes (no cups or cones) so imagine our sacrifice ;-) I very much recommend it, the ice cream was a-m-a-z-i-n-g !
Location:
Annecy, France
Saturday, October 26, 2013
Chamonix :. Lac Blanc + La Ferme des 3 Ours
above: I love how toddlers can be easily entertained with very few toys (with some dried pasta, empty yoghurt cups and egg cartons, not to mention pinecones we picked up in the forest). The children's books I got from the small flea market in Vallorcine (paid 1€ for 3), and they are so cute I'll have to make a separate post later.
below: our last hiking day was also the foggiest. We had planned to hike to Lac Blanc, one of the most popular hiking trails in Chamonix, and despite the fog we went ahead with our plan. It was so foggy we couldn't see past 2 or 3 m ahead sometimes, but this trail is one of the most well marked so it 's quite impossible to get lost.
We made it there in a bit less than 2 hours, and were almost done with our picnic by the side of the lake when it started to rain. We took shelter in the Refuge where after some hot tea and a huge and flavorful slice of Tart aux Myrtilles decided to head back.
Later that night we walked to La Ferme des 3 ours for our dinner, and it was possibly one of the best meals of the whole trip.
Location:
Lac Blanc, 74400 Chamonix, France
Subscribe to:
Posts (Atom)